Machine-readable: manifest · index · English Markdown
Build and ship your first AR app with the Unity template
The 01Spatial Unity template is an AR Foundation development package designed for customization. It is delivered as a .unitypackage that you import into a new or existing Unity project. The app uses ARKit on iOS and ARCore on Android, while 01Spatial uses visual localization to align the device's current AR session with persistent map coordinates.
The package includes examples of single-frame Snap, four-frame Scan, and Auto localization, plus map-coordinate alignment, server-hosted Content, occlusion meshes, a Mesh pulse animation after successful localization, and a responsive interface. Its default interactions follow the App Clip experience on iOS and the WebXR experience on Android. You can replace the interface, business logic, and 3D content, or extend the localization workflow to build a fully custom AR application.
By the end of this tutorial, you will have an app that runs on a physical device. After the user points the camera at a mapped space and localizes, content that you placed in Unity appears at a fixed position in that space. Every supported device uses the same map coordinates when it enters the space.
1. Prepare the development environment and a map
You only need four things to get started:
- Unity Hub and Unity
6000.3.19f1. - The
01SpatialAR-<version>.unitypackagesupplied by 01Spatial. - A map in 01Spatial whose status is Ready. If you do not yet have one, complete the mapping workflow first.
- A physical ARCore-capable Android device or ARKit-capable iPhone or iPad.
You will obtain the API Key and Map Key later in the tutorial. Platform-specific Unity modules are covered in the Android and iOS build sections, so you do not need to install everything up front.
The Unity Editor Game view does not provide a real ARKit or ARCore camera CPU image, so it cannot complete end-to-end localization. You can author the scene in the Editor, but you must validate localization on a physical device.
2. Create an account and obtain an API Key
The API Key identifies the 01Spatial account making the request. The Map Key identifies the map that the app will use. The Unity template needs both, and you obtain both from the 01Spatial developer Portal.
2.1 Choose the correct Portal
Your account, API Key, and Map Key must come from the same service region:
| Region | Portal | Server Region in Unity |
|---|---|---|
| China | portal.01spatial.cn | CN (China) |
| EU service | portal.01spatial.ai | EU (Europe) |
A Map Key created in the China Portal cannot be resolved by the EU service, and the reverse is also true. Choose the region that hosts the map, not the region where your development computer is located.
2.2 Register and sign in
- Open the Portal for the required region and select Register.
- Register with a supported third-party account, or enter your name, email address, and password.
- Read and accept the current user agreement and privacy documents, then complete registration.
- Follow the on-screen instructions to verify your email address or sign in again.
2.3 Generate and copy the API Key
- After signing in, open the user menu in the upper-right corner and select Profile.
- Find the API Key section.
- If the account does not have a key, select Generate API Key. Otherwise, copy the existing key.
- Store the key temporarily in a secure password manager. You will paste it into Unity later.
Selecting Regenerate invalidates the previous API Key immediately. Every Unity, WebXR, App Clip, or server application that still uses the old key will stop working. Rotate the key only after you have identified and are ready to update every client. See Credentials and keys for scope and security guidance.
3. Create a URP project and import the Unity Package
For a new app, we recommend starting with a blank Universal Render Pipeline (URP) project:
- Open Unity Hub and select New project.
- Choose Unity
6000.3.19f1and the Universal 3D template, enter the project name and location, then select Create project. - Wait for the first import to finish. In Unity, select
Assets > Import Package > Custom Package…. - Choose the
01SpatialAR-<version>.unitypackagesupplied by 01Spatial. - Keep every item selected in the Import Unity Package window, then select Import.
- If Unity reports missing dependencies, select Install. You can also run
01Spatial > Install Missing Packages. Wait for Package Manager and script compilation to finish. - In the Project window, open
Assets/Scenes/01SpatialAR.unity. - Before product development begins, use
File > Save As…to save a copy under your own product directory, for exampleAssets/MyProduct/Scenes/01SpatialAR.unity. A future 01Spatial package update will then not overwrite your scene changes.
A .unitypackage cannot declare UPM dependencies, so seeing a dependency prompt immediately after import is expected. After step 6 finishes, the Console should contain no 01Spatial compilation errors.
The rest of this tutorial starts from the included 01SpatialAR scene. If you are adding 01Spatial to a product scene that already has an AR Foundation rig, use 01Spatial > Add To Scene… and select Use my existing AR rig. Do not create a second ARSession, XR Origin, or AR Camera in the same scene.
4. Understand the scene and coordinate hierarchy
The actual Hierarchy of the included 01SpatialAR scene is:
AR Session & Camera
├── AR Session
└── XR Origin
    └── Camera Offset
        └── AR Camera

01Spatial (Localization Services)
├── Map Features
│   ├── Environment Lighting
│   │   └── Environment Main Light
│   ├── Spatial Content
│   └── Occlusion Mesh
├── Localization UI
└── Event System

XRSpace
├── SDK Content (Generated)
│   └── Map Origin Axes
└── Map - Sample
    ├── Logic (Always Active)
    └── Content (Visible When Localized)

Authoring Light (Editor Only)
For your first integration, focus on XRSpace > Map - Sample > Content (Visible When Localized). Place models, labels, particles, animation, and interactive objects that must stay fixed in the real space under this object. They become visible in map coordinates after localization succeeds.
Leave the other objects at their template defaults:
- Do not change the
AR CameraTransform, or move, rotate, or scaleXRSpace,Map - Sample, orSDK Content (Generated). - Do not place product content under
SDK Content (Generated); 01Spatial manages it. - It is normal for
Content (Visible When Localized)andAR Session & Camerato appear inactive while editing. Do not turn them on as a permanent fix. Authoring Light (Editor Only)helps you see models in the Scene view and is stripped automatically from the app build.- After you download a map,
Reference Geometry (Editor Only)also appears underMap - Sample. Use it to position content against the real space in the Editor; it is not included in the app build.
4.1 Key implementation path
Most integrations do not need to call implementation classes directly. Product code should prefer the stable ISpatialClient interface. The scene's SpatialClientRuntime implements that interface and exposes Snap, Scan, Auto, map switching, and localization success, failure, and state-change events.
If you need to read the source, replace the UI, or extend the workflow, start with this verified path:
SpatialClientRuntimeis the scene's client entry point. It connects account configuration, maps, camera-frame capture, the localization backend, workflows, and feature modules.CameraFrameCaptureServiceis attached to theAR Cameraand captures the image, camera intrinsics, and AR pose from the same frame.Spatial01LocalizationBackendresolves the map through its Map Key and creates the transport used to call the 01Spatial localization API.DefaultSpatialLocalizationWorkflowFactorycreates one default workflow that supports Snap, Scan, and Auto. The concrete state-machine class,DefaultSpatialLocalizationWorkflow, is an internal SDK implementation and should not be instantiated by product code.SlamVpsFusionuses the localization result and its matching sampled frame to calculate the map-to-current-AR-session transform.SpatialClientRuntimeapplies the final transform toXRSpace.SpatialFeatureHostmanages server-hosted Content, Mesh, and environment-lighting modules. Visibility of localContent (Visible When Localized)is controlled bySpatialMapSpaceandSpatialAlignedVisibilityafter alignment is reliable.
These names match the current SDK. The common entry points are TryRequestSnap(), TryStartOrCancelScan(), and SetAutoLocalization(bool), together with the StateChanged, LocalizationSucceeded, and LocalizationFailed events. Do not write localization results directly to the AR Camera Transform.
5. Connect your account in Unity
- In the Unity top menu, select
01Spatial > Account. - Under Server Region, select the service that hosts the map:
- Select
CN (China)for China maps; it useshttps://api.01spatial.cn. - Select
EU (Europe)for EU maps; it useshttps://api.01spatial.ai. - Use
Customonly for a self-hosted or test environment.
- Select
- Paste the API Key copied from your Profile into API Key.
- Select Save.
- Select Verify API Key.
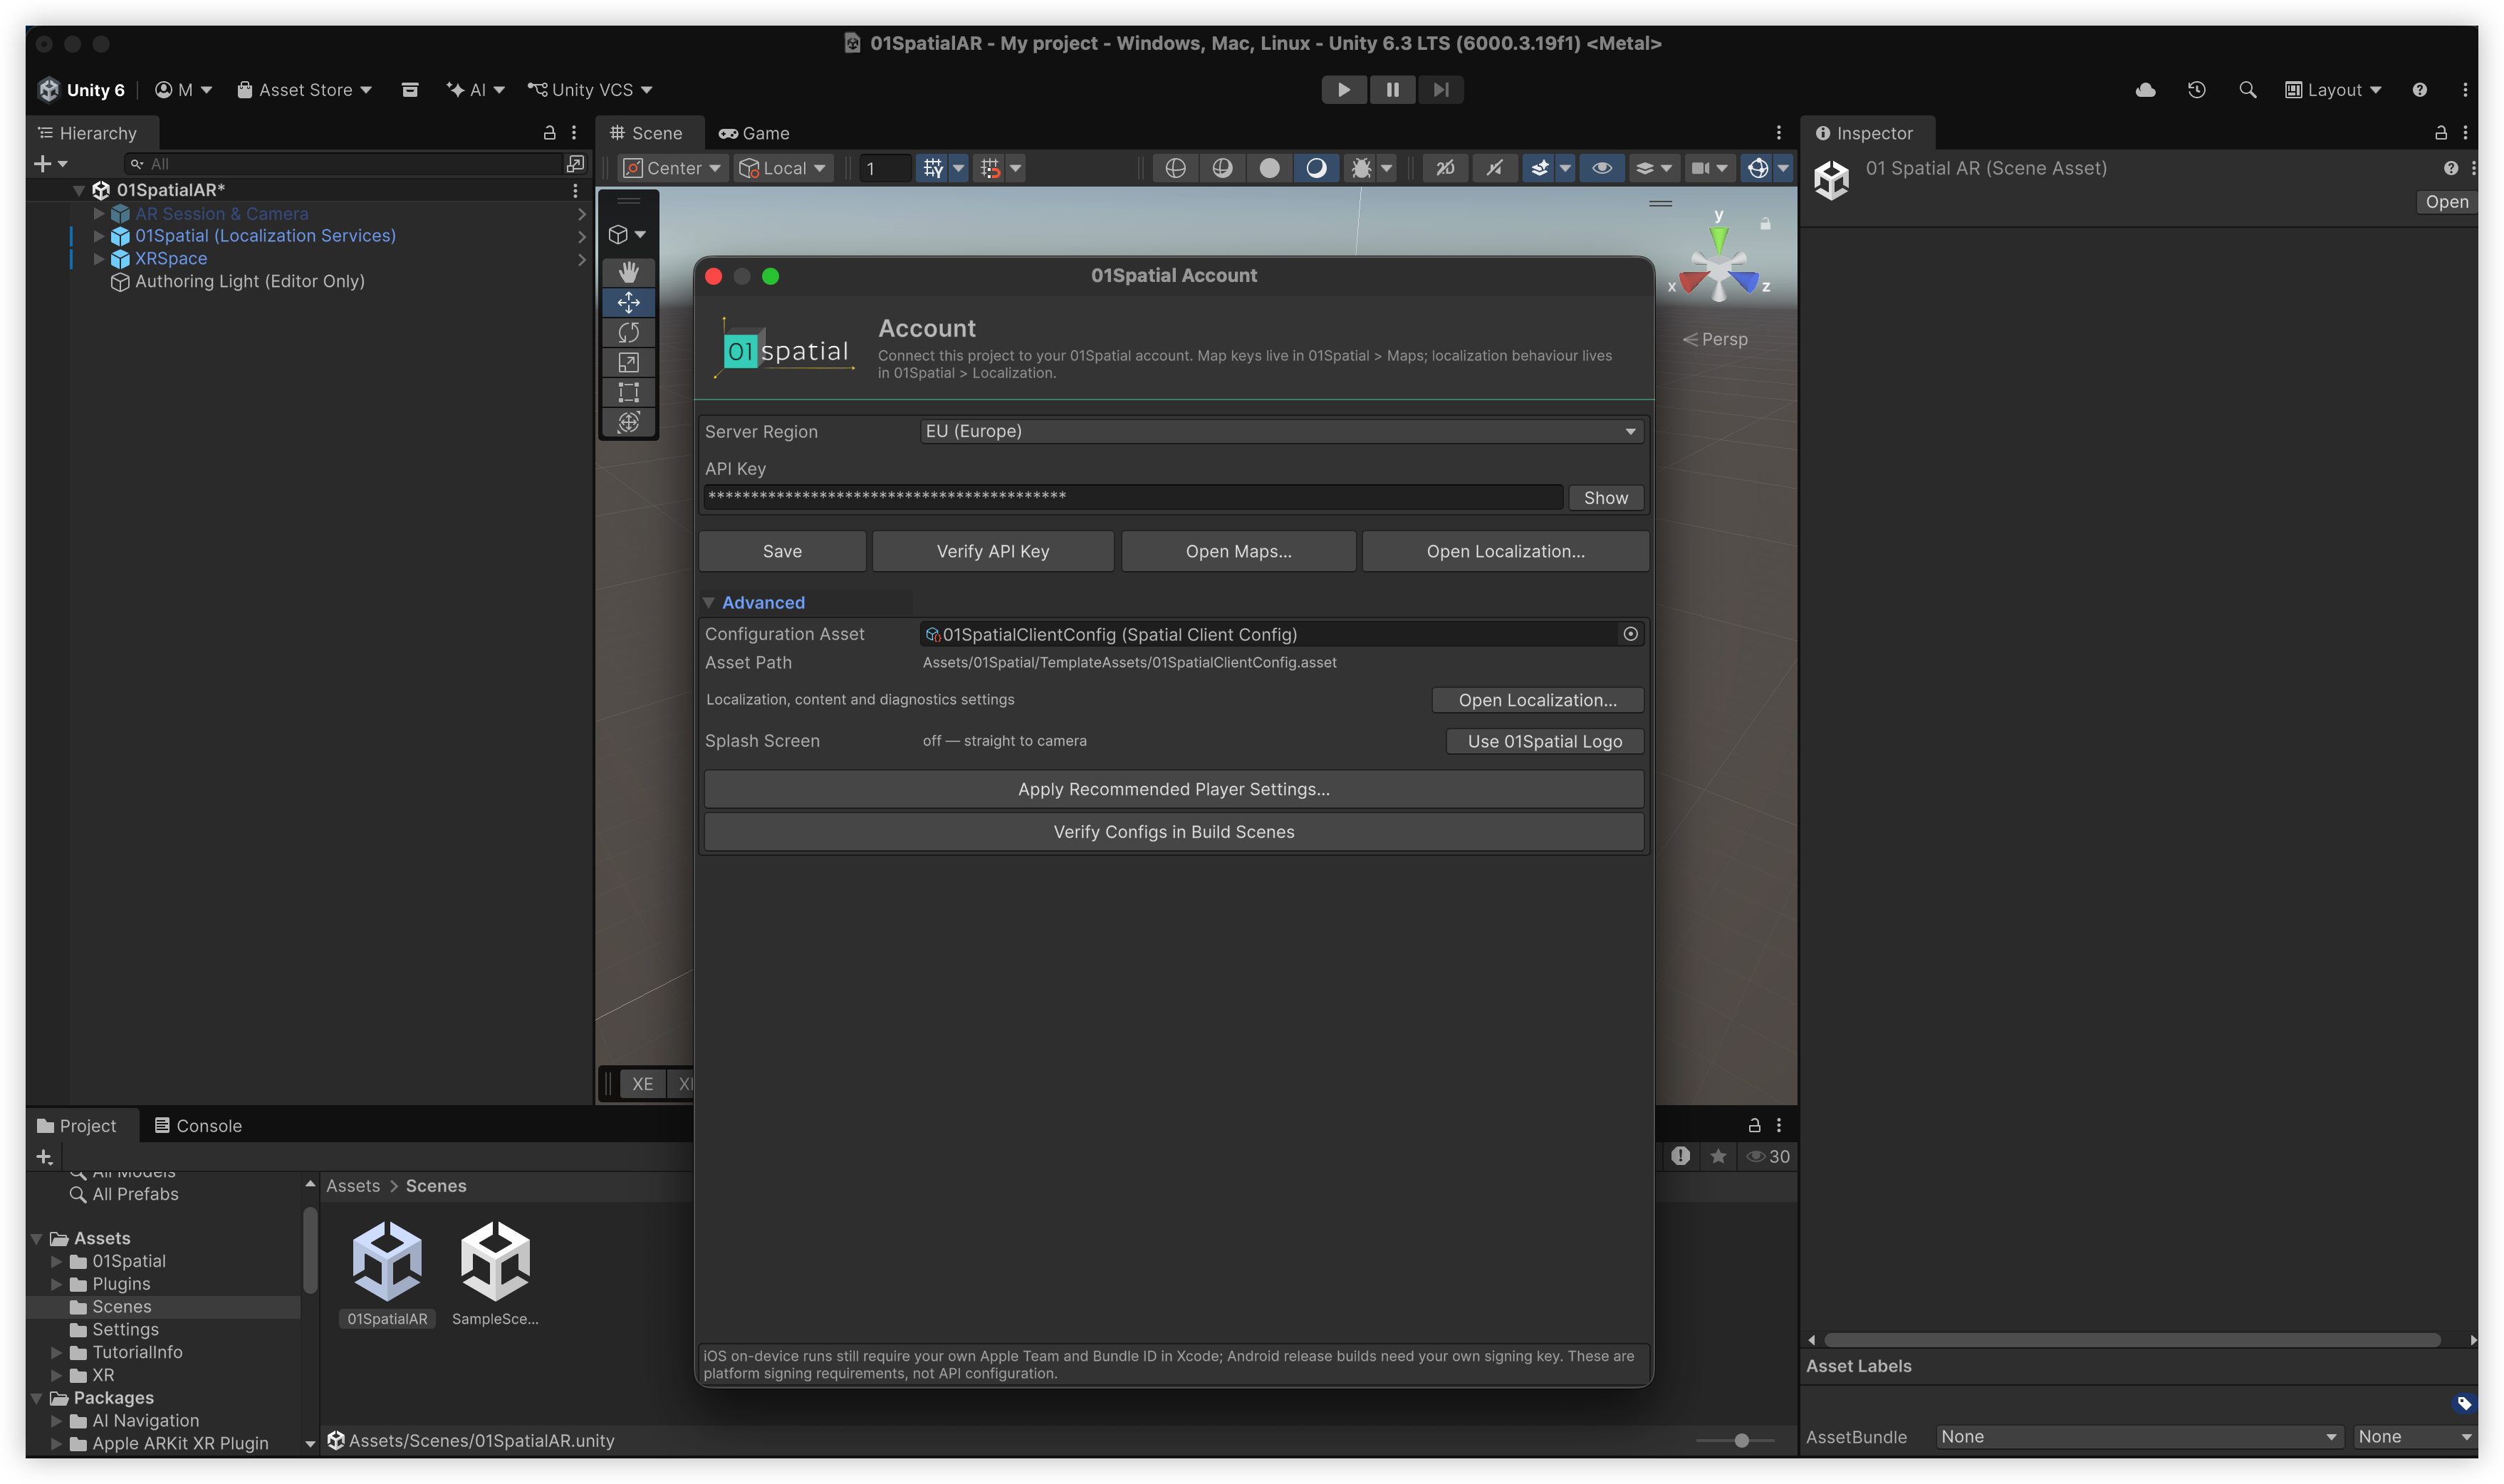
If the scene does not yet have a valid Map Key, verification can check only the local URL and key format. After configuring the Map Key in the next section, verify again so Unity can use a real map-resolution request to validate account access, service region, and map together.
The Account window contains account and project-level settings only. Localization behavior, Content, Mesh, the post-localization Mesh pulse animation, and diagnostics settings live under 01Spatial > Localization; use Open Localization… to open that window. Keep these runtime values at their defaults for a first build unless physical-device measurements justify a change.
The account configuration is stored by default in Assets/01Spatial/TemplateAssets/01SpatialClientConfig.asset, and the keys sit there in plain text. Do not commit real credentials to a public repository, print them in logs, or include them in a public .unitypackage; run 01Spatial > Development > Scrub Credentials For Commit before you commit or hand off a build, and it scans the scenes, prefabs, and config assets under Assets/ and restores the placeholders. A long-lived key embedded in a mobile app can never be completely secret. For a public release, limit abuse through a controlled backend, short-lived authorization, or a managed production entry point, and enforce your authorization policy on the server.
6. Copy the Map Key and connect the map
6.1 Copy the Map Key from the Portal
- Return to the Portal for the same region selected as Unity's Server Region.
- Open Spatial Maps and find the map that the app should use.
- Wait until the map status is Ready. A map that is Building, Processing, or Failed cannot be used for localization.
- Find Map Key on the Ready map card and select Copy. Do not transcribe it manually.
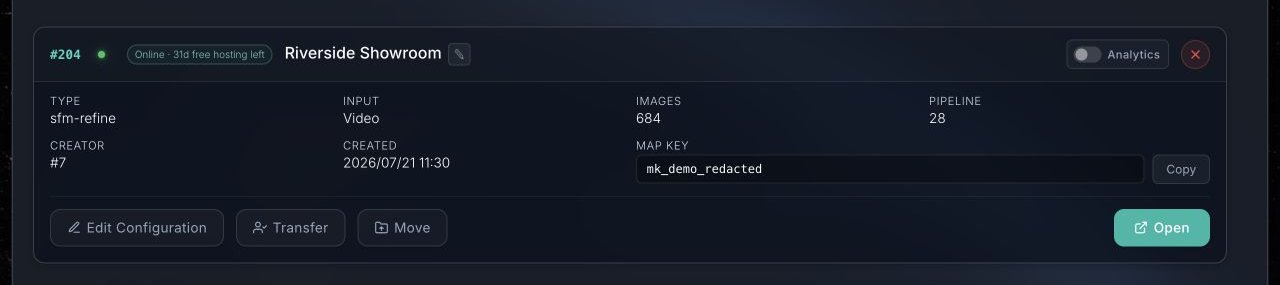
See Manage maps for the complete Map Key and map-management workflow. The current Unity template configures a Map Key on each Map object in the scene. Do not paste a Project Key into this field.
6.2 Configure the Map in the scene
- Return to Unity and select
01Spatial > Maps. - The default scene already contains
Map - Sample. Paste the copied key into that row's Map Key field. - If the scene does not contain a Map, select Add Map. You can give it a recognizable name in the Hierarchy.
- A scene can contain multiple Maps, but it must have exactly one initial map. The starting row displays
Active; otherwise, select Set Active. - Select Verify on the Map row.
- Confirm that the result shows the map name and
ready, and note whether it reportsmetricornon-metric. - Save the scene.
If Verify fails, first check that the API Key and Map Key come from the same Portal region, that the account associated with the API Key can access the map, and that the map is Ready.
7. Download the map
Use 01Spatial > Maps to download the map's point cloud or Mesh into Unity. This lets you see the real space in the Scene view and place AR content at the correct location. Downloaded map data is for Editor authoring only and is not packaged into the app. At runtime, the app still localizes through its API Key and Map Key and loads server-hosted content and geometry only when needed.
7.1 Download the point cloud
- In
01Spatial > Maps, find the Map that you verified. - If the map was built from LiDAR and you prefer its denser point cloud, enable Prefer LiDAR point cloud (source=lidar). If no LiDAR point cloud is available, the service automatically falls back to the sparse SfM point cloud.
- On the Reference Geometry > Point Cloud row, select Download. After a local copy exists, the button label changes to Update. Reference Geometry is the name of this group in the current Unity UI.
- Wait for the download, parsing, and asset import to finish.
- Use the eye button on the Point Cloud row to show or hide it in the Scene view. The Point Size and color controls above it affect only the Editor reference display.
7.2 Download the Mesh
- On the same Map, select Download on the Reference Geometry > Mesh row. Select Update after a reference exists.
- Wait for the textured mesh or other available scene mesh to download and import.
- Use the eye button on the Mesh row to toggle its visibility.
You can download either type of geometry or both. A mesh makes walls and object surfaces easier to read, while a point cloud is usually lighter and reveals the area actually covered by mapping.
Downloaded files are cached under:
Assets/01Spatial/MapReferenceCache/map_<map ID>/
This is a local cache for the current developer and is ignored by Git. The reference objects appear under the Map's Reference Geometry (Editor Only) object and carry an EditorOnly tag, so they are not included in an Android APK or iOS Player. Never put production content under this reference object.
If the map Origin changes in the Portal, Unity warns that the downloaded reference is stale. Verify and download the reference again, then recheck the position of all product content. A non-metric map still uses matching reference and localization coordinates, but one Unity unit may not equal exactly one physical meter. For accurately sized content, prefer a map with metric scale and a correct gravity direction.
8. Place content in the map
You can place simple models, animated models, Prefabs, text, particles, and interactive objects. The steps below use a 20-centimeter cube to demonstrate the common workflow. Replace the cube with your own content while keeping the same parent hierarchy and placement method. The example assumes a metric map; for a non-metric map, use the downloaded map as a visual scale.
-
Select Select Content Root on the target Map row in
01Spatial > Maps. Unity selects that Map'sContent (Visible When Localized)object in the Hierarchy. -
Content may appear gray or inactive while editing. To see and position it in the Scene view, temporarily tick the active checkbox at the top of the Inspector, to the left of the object name. Clear the checkbox when you finish editing so that the scene keeps its default “show after localization” behavior.
-
With Content selected, choose
GameObject > 3D Object > Cube. -
Rename the new object
My First AR Cube. -
In the Inspector, set its Transform to:
Local Scale: X 0.2, Y 0.2, Z 0.2 Local Rotation: X 0, Y 0, Z 0 -
Use the Move Tool to position the cube against the downloaded point cloud or Mesh. For example, place the cube's center 0.1 meters above a tabletop so that its bottom face rests on the surface. For your own model, also account for its Pivot and real-world scale.
-
Confirm that the Hierarchy now has this parent-child relationship:
XRSpace └── <your Map> └── Content (Visible When Localized) └── My First AR Cube -
Save the scene. You can leave the reference geometry visible or hide it with the eye button; it will not enter the final app package.
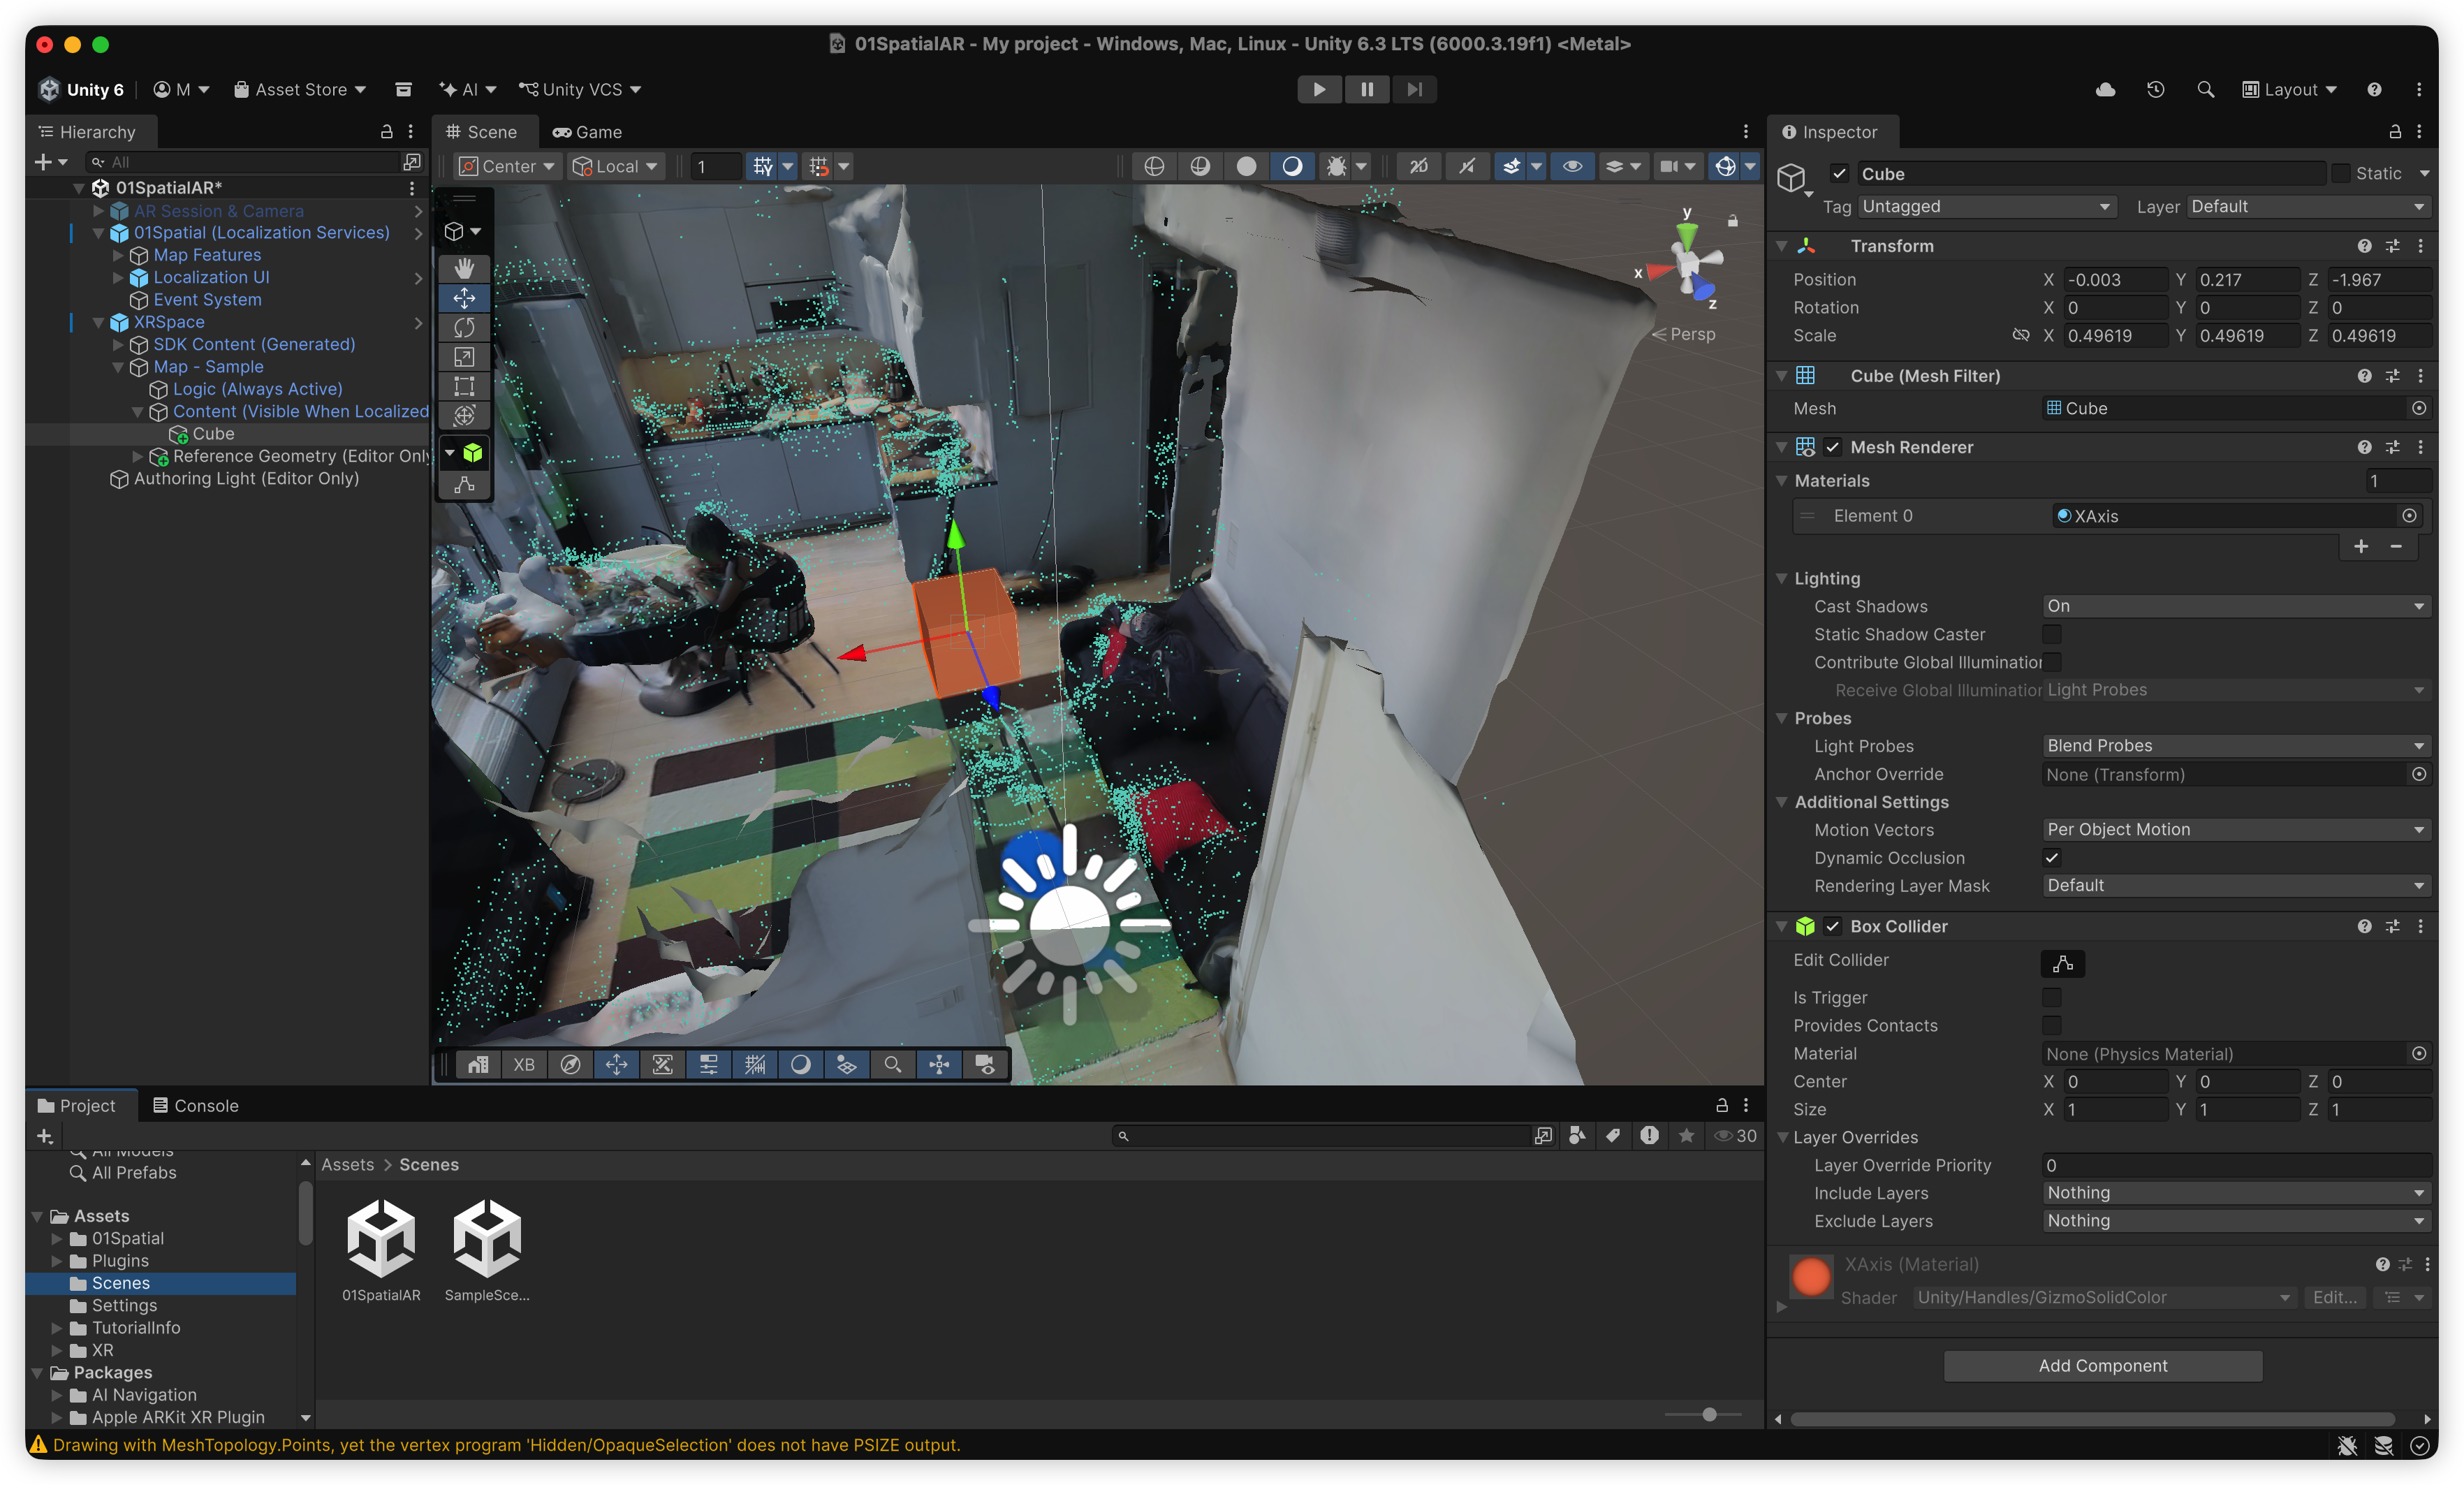
The screenshot illustrates the parent-child hierarchy and visual placement against reference geometry. Its sample Cube Transform is not the 20-centimeter value used in this tutorial; use the 0.2, 0.2, 0.2 scale from step 5.
Do not put product content under the AR Camera, XRSpace, SDK Content (Generated), or Reference Geometry (Editor Only). Only content under the target Map's Content object receives both the correct map coordinates and the “visible after localization” lifecycle.
For a quick workflow test, the template also includes Assets/01Spatial/Samples/SampleMarkerSpawner.cs. Add 01Spatial/Samples/Sample Marker Spawner to an object that remains active and bind its SpatialClientRuntime. It creates a sample cube under the content root when the app starts, then reveals that cube with the root after the first reliable localization. For production content, use the hierarchy above or your own Prefab and business system.
9. Understand localization on a physical device
After the app starts:
- The operating system requests camera permission and starts ARKit or ARCore.
- The template waits for the AR Session and XR Provider to enter full Tracking state.
- Snap sends the current synchronized camera frame. Scan guides the user through a four-frame capture. Auto repeats localization at the configured interval.
- 01Spatial returns the camera pose in map coordinates. The template writes the corresponding transform to XRSpace, not to the AR Camera.
- After localization is reliable, the active Map's
Content (Visible When Localized)becomes visible as a unit. Server-hosted Content and the occlusion mesh also run according to their configuration. When the corresponding effect is enabled, the Mesh appears with a pulse animation after successful localization, providing a clear success cue. - AR Foundation continues smooth frame-to-frame tracking, while later localizations correct the map alignment.
For the first on-device test, stand inside the mapped area and point the camera toward textured, structurally stable features that still resemble the scene at mapping time. Move the device slowly until AR Tracking stabilizes, then use Snap. If one viewpoint is unreliable, use Scan.
You can first test localization in Space Studio to confirm that the map itself localizes before troubleshooting the Unity project or device.
10. Apply recommended settings and run preflight
Complete this shared setup before the first build:
- Select
01Spatial > Apply Recommended Project Settings...from the Unity top menu. A new blank URP project can adopt these baselines directly. If you are embedding the SDK into an existing product, review the project-level Player/XR Settings changes first. - Select Apply Settings in the confirmation window and wait for Unity to update the project and XR configuration.
- In Unity Player Settings, replace the placeholders with your Company Name, Product Name, app icon, Android Package Name, and iOS Bundle Identifier. Recommended settings also replace the splash screen with the 01Spatial-branded image; replace it under Splash Image or disable it before release.
- Open and save the scene you are developing. If you used Save As in section 3, keep that copied scene open.
- Run
01Spatial > Fix Build Blockers...and confirm the fixes. A.unitypackagecannot edit its host project's Build Profiles. This command makes the currently open scene that containsSpatialClientRuntimethe first enabled Scene and adds the required AR Background Renderer Feature to URP. - Open
01Spatial > Account, expand Advanced, and select Verify Configs in Build Scenes to check that every build Scene is bound to the intended Config and Map. - Select
01Spatial > Build > Check Android Settings (No Build)orCheck iOS Settings (No Build). These commands run preflight without creating an app. Preflight itself is read-only. Fix every Error and review each Warning as a product or release recommendation.
Recommended settings establish baselines such as Linear Color Space, automatic AR Foundation startup, IL2CPP, Android API 26+/ARM64/ARCore/OpenGLES3, and iOS 16+/ARKit, but they do not force an existing project onto one render pipeline. The bundled materials support both Built-in and URP, so Built-in and URP work out of the box.
URP also requires AR Background Renderer Feature on every Universal Renderer used by the default pipeline in Graphics Settings or by a pipeline referenced from any quality level. Preflight checks each one, so fixing only the mobile quality level is not enough. Without it, the app can build successfully but shows a black background on the device. Preflight blocks this configuration as SPATIAL-E071. When an interactive build finds fixable Player/XR settings, Build Profiles ordering, or this URP Feature, Unity offers Fix and continue. You can also run 01Spatial > Fix Build Blockers... at any time. Both actions explicitly modify project assets; batch mode and CI never apply them automatically. You must still sign each platform with your own identity.
11. Build the Android app
11.1 Install the Android modules
In Unity Hub, find Unity 6000.3.19f1, select Add modules, and install:
- Android Build Support
- Android SDK & NDK Tools
- OpenJDK
11.2 Configure Android product information
- Open
File > Build Profiles. If Android is not listed, select Add Build Profile > Android > Add Build Profile. Select the Android Profile, then choose Switch Profile. - In Player Settings, enter your own Package Name, such as
com.yourcompany.yourarapp. Do not release the template defaultai.spatial01.arunity. - Set Version and Bundle Version Code.
- Confirm that Scripting Backend is IL2CPP, Target Architectures includes ARM64, and Minimum API Level is at least 26. API 26 is the lowest Android baseline currently verified by 01Spatial.
- Keep Target API Level set to Automatic (highest installed) so Unity uses the highest Android SDK installed on the development computer. Before a Google Play release, also confirm that this SDK meets the store's current Target API requirement.
- Confirm that ARCore is Required, Internet Access is Require, and OpenGLES3 is first in Graphics APIs. Recommended settings reduce that list to OpenGLES3 only; keeping Vulkan or other APIs does not block the build, but the template baseline only covers the GLES3 render path and preflight warns about it.
- For a store release, configure your own Keystore and Key Alias in Publishing Settings.
- Run
01Spatial > Build > Check Android Settings (No Build)and fix every Error.
11.3 Generate a test APK
Select:
01Spatial > Build > Android APK
On success, Unity writes:
Builds/Android/01SpatialAR.apk
If Android is not the active platform, nothing is built this time. The menu takes two steps and shows two dialogs:
Switch to Android firstappears. The platform only changes when you choose Switch to Android (no build yet); choosing Cancel neither switches nor builds, and only writes one line to the Console.- Once Unity has recompiled,
Android platform is readyappears. Choose Build now to start the build, or Later to trigger the build menu yourself afterwards.
The first build after a platform switch therefore takes two clicks; that is expected. Do not force a build while the platform switch is incomplete.
With an Android device connected and USB debugging enabled, install the test package with the Android SDK's adb tool:
adb install -r Builds/Android/01SpatialAR.apk
The built-in menu generates an APK for local on-device testing. For Google Play, enable Build App Bundle (Google Play) in the standard Android Build Profile, generate an AAB, and sign it with your release Keystore. The test device must also support ARCore and have Google Play Services for AR installed and working.
The build script uses transactional output: it replaces the previous APK only after the new build succeeds completely. If a build fails, the last successful package remains. When troubleshooting, check both the Unity Console and the file timestamp; the presence of an old APK does not prove that the current build succeeded.
12. Build the iOS app
12.1 Prepare macOS and Xcode
An iOS build must be completed on macOS:
- Install iOS Build Support for Unity
6000.3.19f1in Unity Hub. - Install Xcode 26.0 or later, launch it at least once, accept the license, and install its required components. The template uses ARKit XR Plugin 6.5, whose static libraries were built with Xcode 26; Unity therefore requires Xcode 26.0 or later for apps that include this package.
- Prepare an Apple Developer Team that can sign a physical device build.
12.2 Configure iOS product information
- Open
File > Build Profiles. If iOS is not listed, select Add Build Profile > iOS > Add Build Profile. Select the iOS Profile, choose Switch Profile, and wait for script compilation to finish. - In Player Settings, enter a unique Bundle Identifier, such as
com.yourcompany.yourarapp. - Set Version and a non-zero Build Number.
- Confirm that Target minimum iOS Version is at least 16.0. This is the device baseline verified by 01Spatial.
- Confirm that Requires ARKit is enabled, Scripting Backend is IL2CPP, Architecture is ARM64, and Metal is first in Graphics APIs.
- Review Camera Usage Description and make sure it accurately explains why the app uses the camera.
- Run
01Spatial > Build > Check iOS Settings (No Build)and fix every Error. Unity's ARKit build processor still validates Xcode, ARM64, and Metal after 01Spatial preflight succeeds, so do not skip step 5.
12.3 Export the Xcode project
Select:
01Spatial > Build > Export iOS Xcode Project
On success, Unity writes the project to:
Builds/iOS
If iOS is not the active platform, the first menu selection does not export. The flow matches Android above: choose Switch to iOS (no build yet) in Switch to iOS first to change platform, then choose Build now in iOS platform is ready once recompilation finishes. Choosing Cancel does nothing at all. This two-stage process ensures that Unity ARKit and the template's iOS/Swift post-processors execute in the correct script domain.
12.4 Sign and install in Xcode
- Open
Builds/iOS/Unity-iPhone.xcodeprojin Xcode. - Select the Unity-iPhone target and choose your own Team under Signing & Capabilities.
- Confirm that the Bundle Identifier matches Unity Player Settings and is globally unique.
- For development, you can enable Automatically manage signing. If your team uses a fixed Provisioning Profile, follow its internal distribution process.
- Connect an ARKit-capable iPhone or iPad, unlock it, and trust the development computer. If the device asks for Developer Mode before installing a local development build, open
Settings > Privacy & Security > Developer Mode, enable it, and follow the restart prompt. - Select the Unity-iPhone scheme and the physical device in the Xcode toolbar, then run Build and Run.
- For TestFlight or the App Store, select Any iOS Device (arm64) or the equivalent generic device destination in your Xcode version, run Product > Archive, and complete validation and distribution in Organizer.
The template includes Assets/Plugins/iOS/PrivacyInfo.xcprivacy as a baseline Privacy Manifest. If you add analytics, advertising, login, file access, or other third-party SDKs, review and extend the manifest for the product's actual data use. The template baseline is not a final privacy declaration.
iOS export also uses a transactional directory swap: it replaces Builds/iOS only after a complete success. After a failure, that directory may still contain the previous successful export. Check the Unity Console and export timestamp.
13. Continue developing on the template
The cube is only the smallest example. Observe these boundaries as the application grows:
- Put your Prefabs, scripts, and assets in a separate product directory such as
Assets/MyProduct/to reduce conflicts when upgrading the SDK. - Put physical-space content under the corresponding Map's
Content (Visible When Localized)so the template can reveal it after localization succeeds. - Extend presentation with your own Prefab Variants, Views, or Feature Modules. Do not modify the AR Camera or add a second ARSession/XROrigin to the scene.
- If your product already has an AR Foundation rig, use the template's Embedded Client integration so that 01Spatial binds to the existing ARSession, XROrigin, and AR Camera. Do not create a second provider.
- Server-hosted Content and local Unity content share the same map-coordinate source. You can combine them for tours, navigation, shared multi-user anchors, game logic, or digital-twin interfaces.
- Before release, validate permissions, Tracking recovery, Snap, Scan, Auto, foreground/background transitions, screen rotation, weak networks, occlusion, thermal behavior, and long-session drift correction separately on iOS and Android.
14. Troubleshooting
Account or Map verification fails
- Confirm that Unity's
CN (China)orEU (Europe)selection matches the Portal and Map Key source. - Make sure you did not paste a Project Key into the Map Key field.
- Confirm that the account associated with the API Key can still access the map and that the key was not invalidated by regeneration.
- Confirm that the map is Ready, not offline, building, or failed.
The downloaded map is not visible
- Use the eye button on the Point Cloud or Mesh row to enable the display.
- Select the reference object and press
Fin the Scene view to frame it. - Increase Point Size if the point cloud is too fine.
- If the map has no textured mesh, download the Point Cloud first. If the LiDAR option is unavailable, allow the service to fall back to the sparse point cloud.
Localization succeeds, but content is not visible
- Confirm that the content is a descendant of the active Map's
Content (Visible When Localized). - Confirm that it is not under
Reference Geometry (Editor Only)orSDK Content (Generated). - Confirm that its local position is close to the downloaded reference and that its Scale is not zero.
- Confirm that the app uses the same Map Key that was used when positioning the content.
- If the map Origin changed, download the reference again and recheck the object position.
Snap and Scan are unavailable
- Grant camera permission first.
- Move the device slowly and wait for ARKit or ARCore to enter full Tracking.
- Confirm that the scene has only one active ARSession, XROrigin, and camera provider.
- The Editor Game view cannot provide a physical-device CPU image; test on a device.
Android or iOS build does not start
Switching platforms reloads Unity's script domain, so the build menu intentionally ends the build attempt when it detects a different active platform. First check that you pressed Switch to <platform> (no build yet) in the first dialog rather than Cancel — after Cancel the platform does not change, the menu looks like it did nothing, and the reason is written to the Console. Once the switch and recompilation finish, choose Build now in the second dialog, or trigger the build menu yourself.
A URP build shows only a black camera background
Confirm that every Universal Renderer used by the default pipeline in Graphics Settings or by a pipeline referenced from any quality level contains AR Background Renderer Feature. Run 01Spatial > Fix Build Blockers... first. If the report says that a Renderer could not be updated, open that Universal Renderer asset, select Add Renderer Feature > AR Background Renderer Feature, and rerun the target-platform check.
The full 01Spatial menu is missing after importing a .unitypackage
The required Unity packages are probably not installed yet, so the 01Spatial assemblies are temporarily excluded from compilation. Select 01Spatial > Install Missing Packages and wait for Package Manager and script compilation to finish. If installation fails, use the package names listed in the Console to add each dependency through Window > Package Manager.
Localization still fails
Test the same place and map in Space Studio first. If Space Studio also fails, inspect map coverage, environmental changes, lighting, and visual texture. If Space Studio succeeds but Unity fails, inspect the region, keys, permissions, AR Tracking, network, and Console logs. See Troubleshooting for server error guidance.
15. Pre-release checklist
- The API Key and Map Key come from the same Portal region, and the target map is Ready.
- The scene has exactly one active starting Map, and the Map passes verification.
- Product content is under the correct Map's
Content (Visible When Localized). - Product code does not change the position, rotation, or scale of XRSpace, the Map root, or the SDK Content root.
- The Android Package Name and Keystore, or the iOS Bundle Identifier, Team, and signing settings, have been replaced with product-owned settings.
- Company Name, Product Name, app icon, and splash screen are your own, with no 01Spatial branding left.
- Both
Check Android Settings (No Build)andCheck iOS Settings (No Build)report no Error; every Universal Renderer used by the default pipeline in Graphics Settings or by a pipeline referenced from any quality level contains AR Background Renderer Feature. - The build artifact timestamp matches the current build; an older APK or Xcode project retained by transactional output was not mistaken for the new result.
- Localization and content placement have been validated on both a physical Android ARCore device and a physical iOS ARKit device.
- Test keys, logs, screenshots, and exported packages no longer expose sensitive information, and the privacy declaration has been reviewed.